T. K. and Sweetie Tie the Knot, Part 1: The Preparations
Sweetie and I are now officially an old married couple. For ease of URL-sharing, I've split my post about our wedding into two. First, the preparations!
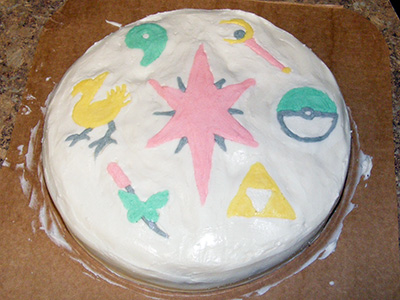
The Cake
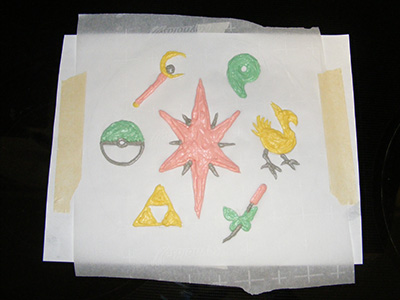
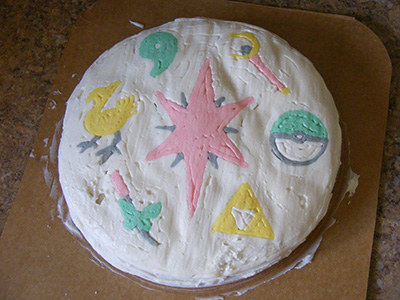
While Sweetie was still in Indiana, over Skype we designed a cake that represents the activities we've shared over the past ten years. My single community college drawing class didn't give me the skills to freehand the design, so I researched how to trace patterns onto cakes for decorating. The Internet instructed me to...
- Use an image editing program to flip the design horizontally. Print it out. Trace the pan you'll be using around the design to make a perfect cake-sized template.
- Put the template on a solid surface, like a piece of cardboard or a pane of glass.
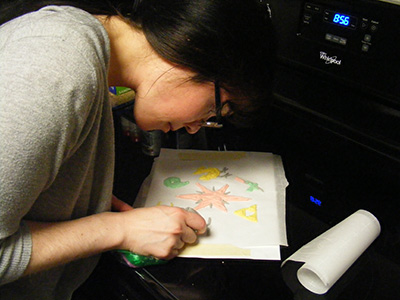
- Tape a piece of transparent parchment or wax paper over the template.
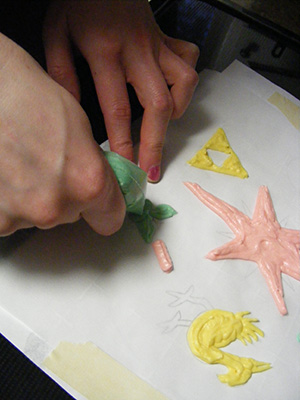
- Pipe colored buttercream frosting directly onto the parchment paper, following the template underneath.
- Fill in the rest of the template with background frosting to create one massive cake topper.
- Freeze the topper overnight.
- Flip the frozen topper onto the top of the prepared cake. Carefully peel off the parchment paper.
- Gently smooth out the bumps and lines in the frozen frosting with a clean finger.
- Bask in the compliments on your supposed artistic genius!
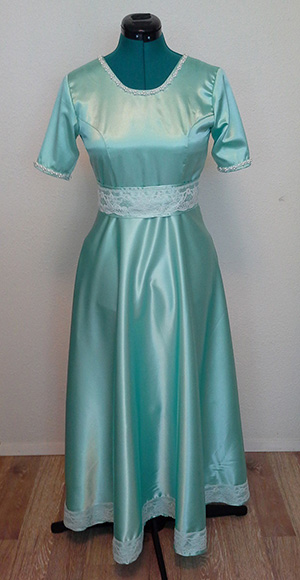
The Dress
Sewing the dress was a month-long process. I chose the fabric first: a mint polyester charmeuse. Since charmeuse is thin and slippery, I decided to draft a very simple pattern for it—princess seams, a low back, and a long half-circle skirt. Then I glammed up the arms and neck with pearl embellishments my mother sent me.
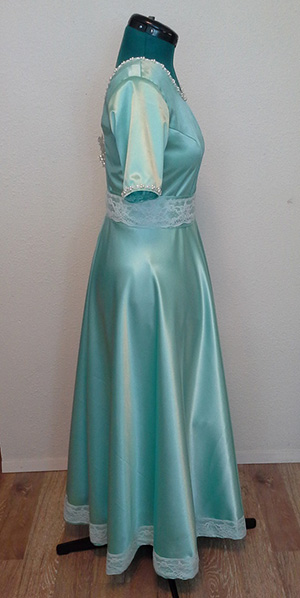
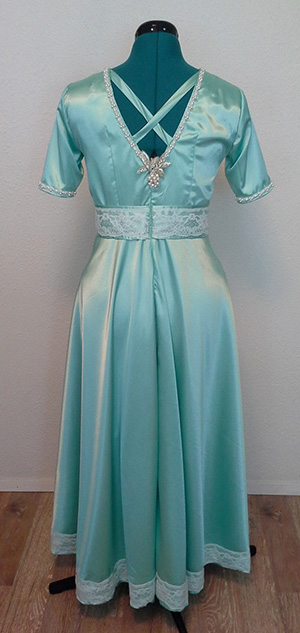

The pearl flower at the base of the low back hides the zipper slider. The idea was a "happy accident." I hadn't expected the top of the zipper to look so sloppy, and when casting around for ways to fix it I spotted the pearl flowers I'd planned to use in hair accessories. I sewed hooks to one flower and eyes to the dress, and now after zipping up I can attach the flower over the top.
The lace along the sash and hemline was also a "happy accident." When I sewed the skirt, the charmeuse twisted and left me with an ugly bunched-up hem. I bolted to Jo-Ann Fabrics and found a pretty bridal-looking nylon lace to cover up the bunching. Then I added the lace to the sash for cohesion.
Later I'll cut the skirt to tea-length and replace the sash with another color, and then I'll have a regular party dress for other occasions.
The Accessories
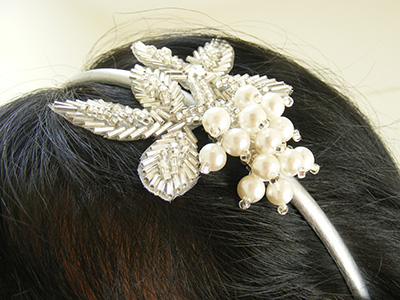
For my hair, I took a cheap plastic headband and covered it in several coats of silver nail polish. After letting it dry for 24 hours, I used E6000 industrial-strength adhesive to attach another pearl flower to one side.
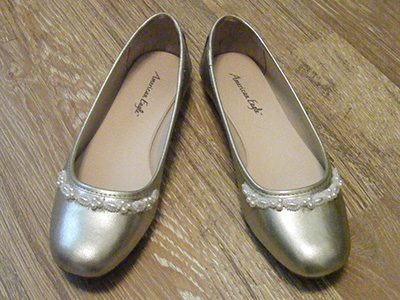
For my shoes, I found a pair of gold ballet flats at Payless Shoe Source. I used the E6000 to decorate the toplines with the same pearl strings I sewed along the neckline of my dress.
The Miscellany
In the week leading up to the ceremony, I purchased our rings, prepared Sweetie's suit and tie, and colored my hair black with a vegan PPD-free dye that turned my skin and bathtub various shades of blue, purple, and green. Sweetie flew back from Indiana five days before the wedding—just enough time to apply for our marriage license and scrub the "chariot," a.k.a. the 2002 Ford Taurus.
These preparations complete, we had only to wait for the clock to tick down to Part 2: The Wedding.
Comments
No comments